Posts for Tag : Lake Area Painting & Decorating

standard

Wallpaper Removal

Super hard or super easy!  Wallpaper removal is all based upon one issue.  Were the walls properly prepared prior to hanging?  When hanging wallpaper the walls must be primed or sized with a sealing type paint or primer that is made for this process.  Back in the ’70s and 80’s I hung wallpaper almost every day.  It truly was the in thing.  The very best way to size the wall is to use an oil-based slow dry primer with a flat or Matt finish. Don’t use quick-dry oil primers, they are shiny and the paper may not adhere.  The next best thing to size is a water-based sizing specifically designed for under wallpaper.  Oil-based primers are best because they bond great to the existing latex wall paint and they insure and will not let the paste or the water at removal time penetrate into the underlying paint and wallboard.  The removal is a snap with oil-based primers. 

Problems:

1:   If the walls were not sized and or the paper installer hung the paper over raw sheetrock or over cheap latex paint then the problems just got worse.  The wallpaper will come off in small pieces and you will do a lot of damage to the wall creating a lot of patching to get the wall looking nice for paint.

2:   Pre-pasted, vinyl-coated wallpapers:  Water will not penetrate the vinyl coating and they can seldom be removed in large pieces or sheets.

The process for removal!

Tape the baseboards and cover the floors with two layers of protection.  You will be using a lot of water.

Step # 1:  Test the existing wallpaper.  Locate a seam, joint or edge of the wallpaper.  Use your fingernails or a flexible putty knife to see how much of the top layer can be removed without any water.  Three things can happen.  If the top layer or all of the paper is solid vinyl, then it will come off in sheets.  This is the best outcome.  If you start at the bottom corner or a top corner and slowly pull away at an angle the paper may come off in sheets just like it went on.  If the paper is fabric backed then the only thing left behind will be the adhesive (more on that later).

Step # 2:  If the wallpaper is paper backed vinyl (i.e. the top layer came off and there is a fuzzy paper layer still on the wall) or if you were unable to remove the top layer then there are additional steps.  It’s time to break out the pump-up garden sprayer.  A one or two-gallon unit will suffice.  It’s also helpful to buy some paste removal products like DIFF.  Mix as per instructions using hot water (hotter the better) and wet the wall down. Start with maybe an 8’-10’ wall.  You will need to soak the paper with 2-3 applications of hot water over a 10 – 30-minute time frame.  Make sure you test after each layer of water to see if the paste has softened.  You will need putty and or patching knives for this process.  When the paste is soft, you should be able to slide the putty knife under the paper layer.  Apply pressure to the putty knife against the wall and slide the blade under the paper removing the paper layer.  If the paper gets too wet or if it is too dry you will have trouble.  At this point do everything you can to prevent wall damage.  Priming, patching, sanding all take a lot of time and a fair amount of skill to make the walls look nice. 

Step # 3:  At this point, all the paper has been removed.  The walls may have a very heavy layer of paste or a very thin layer. The paste could be so thin that you can hardly tell it is there.  It’s time to test again.  Use that pump-up garden sprayer and wet down a small area about 2’x2’ you may have to wet it down again as stated above.  Use your fingers and test the wet down area.  It will be slippery or sticky.  At this point, you will need 5-gallon buckets, 3M scotch bright pads, and sponges.  You will need to keep wetting down the wall and washing off the paste until the walls are clean and free of paste.  The wall is free of paste when your wet finger grabs to the wall rather than slides on the wall.  The idea here is that you will be washing the paste off the wall and rinsing the sponge into your bucket.  You will need to continue to change your water.  Washing the wall with dirty (paste filled water)  is pointless.  If you don’t remove all the paste from the wall then the new layer of paint may not adhere or it may bubble up.  It is very important to remove all the paste from the walls.  Use lots of light and be patient. 

Problem wallpaper (vinyl coated).  If you can’t remove the top layer and or the paper won’t get wet with the sprayer then you will need to sand.    The point here is to break down the coating on top of the wallpaper.  When the wallpaper was manufactured they used a varnish type vinyl coating and sprayed the front of the wallpaper.  This is preventing water penetration and preventing the underlying paste from getting wet.  Buy or borrow a random orbit sander and find some 40 Grit sandpaper to sand the coating off the wallpaper.  You will need to test wash to ensure that you sanded enough.  Sanding will create scratches in the varnish type coating this, in turn, will allow the water to penetrate and soften the underlying glue and or adhesive.  When you are able to wet down the paper, then complete as stated above with steps two & three.

Finally, it’s time to patch the walls to ensure the walls look nice for painting. 

Feel free to call Lake Area Painting & Decorating with questions or for a price to complete all this work as stated above. We would love to hear from you.

standard

PART THREE-Removing and Repairing Damage Ceiling Texture

Worst case scenario:  Your texture is damaged, your sheetrock is damaged and you need to repair both.  You first need to decide if you need to remove and replace any sheetrock.  If the sheetrock is bowed or sagging, that problem can only be remedied with sheetrock replacement.  Call a contractor, this process will not be explained below.  However, if you have a few holes in your ceiling fist sized or smaller, or the texture is falling off?  No problem, read on! 

First remove any loose texture with a metal putty knife (1.5” – 6”) blades usually work best depending upon the amount of damage and how tight the texture is.  The goal here is to remove loose, soft and or damaged texture until you find tighter or sound texture.  When we say remove we mean that the ceiling will be smooth underneath the texture.  The damaged area will still be dusty or chalky but all the bumps will be gone.  The difficulty here is again due to lack of a primer under the texture and/or no paint on top of the existing texture. It’s hard to know when and where to stop the removal process. You will need to remove all the water damaged texture.  If you just paint over damaged texture it may fall to the floor when you paint.  This can even happen years later.  Once you have removed the damaged texture you will need to bevel back the remaining sound texture at the edges of the damaged area.  You can’t leave a line, edge or ridge at the joint where the texture is sound and the removed area.  We use a stiff putty knife to remove the sound texture.  Yes, you will now be removing the sound texture to create a beveled edge.  This beveled edge must be at least 5” wide.  The idea here is to remove all the texture at the joint and carefully remove less and less texture as you move away from the joint.   (The joint is the spot where you stopped removing the damaged texture and the sound texture begins)  You are trying to create a 5”-10” area that is beveled.  As you move out and away from the joint you will be removing less and less texture. This beveled area is the key to hiding the damaged area.

Patching Holes:   Don’t patch until you prime the damaged area.  Patching compounds will not stick well to dusty and/or chalky areas.  The best primer for something like this is again a clear thin primer like Zinsser-Gardz Problem Surface Sealer from Abbott Paint & Carpet.  Prime the entire area that you have worked on and allow to dry.  When patching, if the hole is smaller than or slightly larger than a standard pencil then you can just use any type of spackle or patching compound.  If the hole is the size of a quarter then Gravity will pull the patch out of the hole to some degree.  Fill the hole first with something.  That something will need to be tightly inserted and can’t stick out of the hole.  That something (Joint tape, a piece of sheetrock, some foam spray etc.) must fit tightly to the sides of the hole.  Then fill as stated above.  Always use at least two coats of patching compound and allow to dry between coats.  For larger holes use a metal mesh patch available at your local paint or hardware stores. Follow the directions on the label for application.  Use at least 2 – 3 coats of joint compound to adhere the metal mesh patch.

Okay!  Damaged texture has been removed, beveled edge installed, damaged area primed, holes patched it’s time to texture.

There are some aerosol textures on the market for small spots.  Read the instructions carefully and be prepared to apply the product 2-3 times.  You must allow the product to dry between coats.  These aerosol texture cans may work very well for small spots.

If you rent a texture machine you will also need a bag of texture, 99% of ceiling texture products are of a medium size (more than likely you will need medium).  Follow the directions on the back of the texture bag.  Talk to the people at the rental store.  This is all trial and error stuff, be patient.  There are three different variables at play when you apply texture.  Airflow or the volume of air, the hole size in the texture gun and or the thickness or thinness of the texture itself.  It’s a super messy process, start small and be prepared to wipe off the texture if it doesn’t look right.  Try, try again don’t worry too much about messing it up you can always call Lake Area Painting & Decorating.

If the damaged area is larger than a soccer ball? Call your local contractor, Lake Area Painting & Decorating or you can rent a texture machine. Or you can do all the work stated above then call Lake Area Painting & Decorating.

If you succeed with the texture the texture is dry, everything looks great.  Then look carefully for water stains.  If you see them then deal with them as explained above using a spray can of spray primer Zinsser B-I-N or Kilz Original. 

Paint your ceiling as stated in a previous blog post or again call Lake Area Painting & Decorating Inc. Thank you for taking the time to read our blogs!

standard

PART TWO-Painting a Textured Ceiling

This process in and of itself has caused many people problems, pain and cost.  You see the dirty little secret is that 95% of textured ceilings are installed incorrectly when the house is built.  All manufacturers of sheetrock, joint or patching compound and texture recommend that new sheetrock is primed prior to installing texture.  This step is usually skipped.  In modern home building, ceilings are very seldom primed prior to applying texture.  This practice creates major problems when you want to paint a textured ceiling.  Ceilings textures are water soluble and due to lack of a primer, they have very little adhesion to the new sheetrock.   Latex paints and primers are primarily water.  When the texture gets wet with the paint or primer the texture can fall off of the ceiling.  This is not pretty and can cause you to have to re-texture the complete ceiling.

Make sure all walls, flooring, furniture and all ceiling hardware such as lights are covered.  The most difficult items to cover are the walls.  We use 1.5” OR 2” Low adhesive masking tape by the 3M Company.  The tape must be installed very carefully at the wall ceiling joint. Line the tape up with the texture and firmly press the tape onto the wall.  We use a narrow 1.5” putty knife to secure the top edge of the tape to the wall at the ceiling line.  We leave the bottom edge of the tape loose if possible in order to tuck the plastic under that edge.  We use 12’ wide plastic on a 400’ roll to cover all the walls.  Again you tape the wall at the ceiling line then tuck the edge of the plastic under the bottom edge of the tape.  You then unfold the plastic to cover the walls all the way down to the floor.
Ready to paint?  First and foremost, test the existing texture to see if it has ever been painted, there are many ways to do this.  Try a putty knife edge first, gently scrape at the popcorn texture.  If it has never been painted it will fall off easily, almost like a powder.  You can even scrape it off with your fingernails.  If the texture seams soft like it has never been painted make a 2nd test.  Get a wet sponge and carefully gently wash a very small part of the ceiling.  If it turns to mud and or washes off immediately you have now confirmed that the texture has not been painted.  You must prime the ceiling first before painting it and you should spray the ceiling with an AIRLESS SPRAYER.  You can rent one of these at your local rental store.  You really should hire a contractor at this point.   If the ceilings have been painted before then most of the danger described above is passed. You may only need one coat of paint and you can roll the new paint onto the ceiling.  Use a heavy nap roller ¾”-1” nap.  Take your time don’t miss any spots.

Priming and Painting an unpainted textured ceiling.  Call your local contractor Lake Area Painting & Decorating or rent that sprayer and learn how to use it.  Suffice it to say in untrained hands you can create many more headaches than just water damage.  The process and technique for rolling and/or spraying will not be discussed here.

The safest primer to use in terms of your textured ceiling not falling down is an oil based or alcohol based primer/sealer.  However, if you don’t have a full face respirator you will be overcome by the fumes from the solvents.  We have found in careful hands we can use a quick drying primer like (Zinsser Bulls Eye 1-2-3) or a slow drying Penetrating primer like (Zinsser-Gardz Problem Surface Sealer).  When you apply these primers DO NOT OVER APPLY!  If you saturate the popcorn texture it may fall.  You may want to test a small area first and let it dry.  This will ensure you have no problems.  You want to apply a very even uniform coat.  Once the primer has dried you can apply the finish paint.  You don’t need expensive paint for this.  Actually the cheaper the better, but make sure the color is what you want.  A good product for this is Super Hide from Benjamin Moore.  You can get this product at Abbott Paint and Carpet located in White Bear Lake.

Your best solution for painting your textured ceiling is to call your 5-star local painting company that has been in your neighborhood for almost 70 years, Lake Area Painting & Decorating.

Check back soon for our last blog post in the series – Removing and repairing damaged ceiling texture.

standard

Three Part Blog Series-On water damage/texture & painting repair caused by frost or ice dams

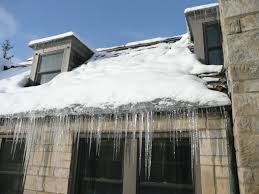
If you have good insulation and good ventilation you won’t get frost damage or ice dams.  Water damage is a serious issue that can cause thousands of dollars’ worth of damage.

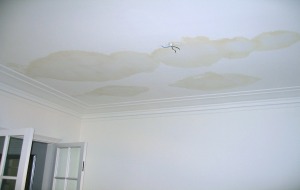
If you do see a stain on your ceiling, usually it’s a dark spot or grayer spot when it’s wet.  When dry it’s that sickly dirty orange-yellow color and it may have some dark streaks mixed in.  You will need to solve the immediate problem.  If you remove the snow and ice from your roof you will have solved the short term problem.  If you decide to do this yourself, be careful!  Ice and snow on a steep roof with a long drop to the ground..do the math!  In addition to the dangers involved you can cause long term damage to your roof using a pickax and/or shovels.  The simple solution is to remove the snow and then use salt and lots of it.  Salt pucks or salt in a nylon sock or pantyhose seem to work well.  In some cases you will not need to climb onto the roof, this will allow the water to drain safely.  You can go online and find some of these products or you can hire a professional to steam or hot water blast away your ice dams.

Ok, so now the problem won’t continue.  The snow and ice are gone, but what about that ugly stain on your bright white ceiling?  When you first notice the stain watch it like a hawk.  The first question would be is the stain growing or getting larger?  If it is not growing then it’s not an immediate problem.  The stain can be as big as a dime and up to the size of a trash can lid without being a serious problem.  The more serious problems happen when the stain starts to change in shape.  Is the texture starting to droop, sag, fall off or crack etc.?  Is water starting to drip or run off the ceiling?  If so, it’s time to take more extreme action.  Water is building up above the ceiling and if you don’t eliminate that excess water it will move into other areas of your home.  You will need to drain away the excess water!  Get a couple of buckets, a ladder or stool and take action.  Find the nastiest looking spot and drive a screwdriver into the sheetrock or any hard pointy object will work.   You may need a hammer to break through the sheetrock ceiling.  Water will start to drip out of the hole you just made.  Capture the water into the bucket.  More holes are sometimes needed to remove the water.  More holes will also allow the ceiling to dry out thus eliminating the potential for mold.  The faster the ceiling dries out the less chance for mold.  Get some fans and heaters pointed at the problem right away to further aid the drying process.  In extreme cases make a larger hole, as large as your fist may be necessary to eliminate the water and dry out the ceiling.  Once the water is gone, the ceiling is dry and spring is here it’s time to repair the ceiling.

Check back soon for part two & three in our series on water damage/texture repair.

standard

Refinishing Interior Windows

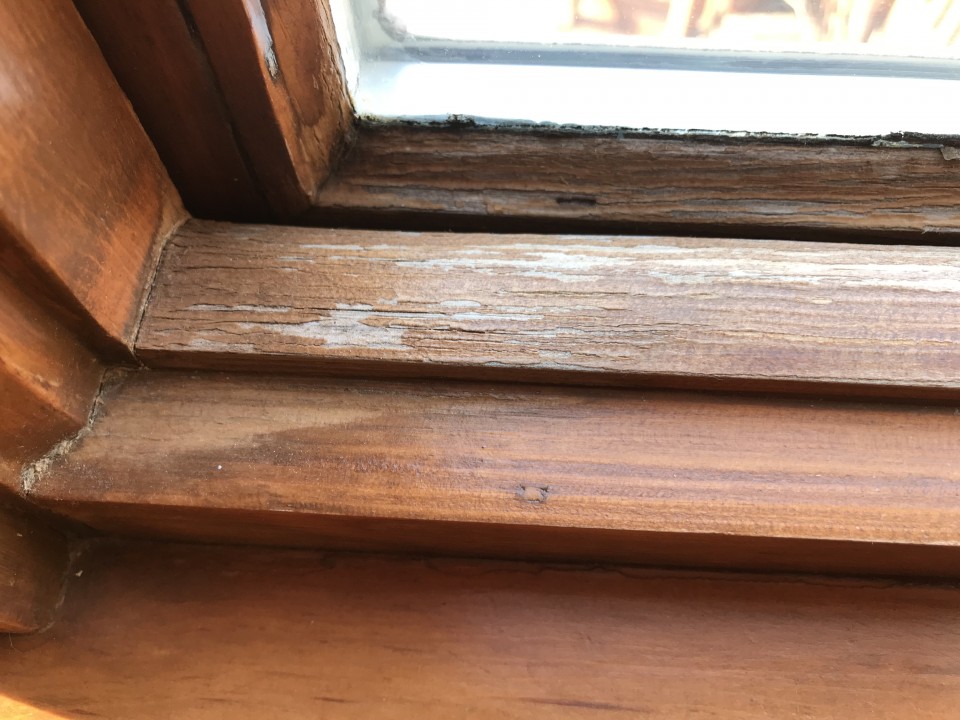
What is wrong with my windows?  The bottom parts of the windows look terrible.  The varnish or paint is peeling, the stain has changed color, there are black and gray rotten looking areas.  Maybe all of the above.

Why is this happening?

There are many reasons from poor quality windows to just lack of maintenance on a wood window in the northern climates.  The basic underlying cause is the weather.  Here in Minnesota in the winter we have extreme conditions. It’s 20 Degrees outside and very dry.  Its 70 degrees inside and higher humidity.  If you’re lucky you have insulated double or triple pane windows, but even so.  There is only about 1”-2” of glass and or wood separating your warm house from the cold outside air.  That is why condensation happens, but there is more.  Expansion and contraction, sun damage, wood that gets wet and won’t dry out.  However, many times it’s just a lack of maintenance or a poor quality original finish of paint or varnish.

Can it be fixed?

Yes, solutions are as follows:  Better windows, the better the window the fewer the problems.  Keep the interior moisture down in your home however, this creates other problems.  Static electricity is not fun, well maybe for the kids.  The real solution is to maintain the finish or re-finish the bottom of your windows.  If neglected they WILL rot and fail.

How to?

First off the wood must be dry and I mean very dry.  We use a moisture meter to test the window sill, sash and jamb.  Once we determine the wood is dry we break out the elbow grease..SANDING. All of the broken and cracked varnish, discolored stain, black or decayed wood must be sanded to a new fresh layer of wood.  If the black or gray damage goes deep and can’t be removed with sanding then we have to break out the wood bleach.  See your local paint store for this product. Open the window and inspect all the surfaces.  There should be no raw wood, often times the edges of the windows were never finished when the house was built.  All raw wood must be finished.  So you have sanded all the damage away and dusted or vacuumed.  Maybe you had to bleach but everything is very dry now.  Most paint stores carry pints of stain, oil-based stains are best due to penetration and ease of use.  Buy 3-5 that you think might work and test them.  You may need to intermix the stain to get the correct color.  Apply the stain to all the surfaces and wipe off all excess.  When dry apply 4 coats of water-based polyurethane varnish to all raw or stained areas.  Make sure you have the correct sheen and make sure you fill the joint between the glass and the wood edge.  It’s even best to get a very thin layer onto the glass.  If you don’t fill the gap that is where the water will soak in.  Take your time and do it right, you don’t want to repeat the process in 3 or 4 years.  10 years sounds better, better yet save some of that varnish and re-apply with a light sanding in 3 years.

If this is something you would rather not tackle your own or just don’t have the time.  Please give us a call, Lake Area Painting & Decorating, we would be happy to help.